Edit Files in the Container
Using ComfyDock Dev Exec
New in ComfyDock CLI: The
comfydock dev execcommand provides a convenient way to access running containers.
The easiest way to access a running container is using the ComfyDock CLI:
comfydock dev exec
This command will:
- List all running ComfyDock containers
- Let you select which container to access
- Open a shell session as the root user
From inside the container you will have access to ComfyUI files at the default path /app/ComfyUI.
Manually installing custom nodes
You can run cd custom_nodes/ and git clone <path to my custom node repo> to manually add new custom nodes (don't forget to fix the permissions after you clone with chown -R comfy:comfy <my custom node repo>! See below for details).
⚠️ Important: Root User Permissions
When using comfydock dev exec, you enter the container as the root user. This gives you full access to modify any files, but it comes with an important caveat:
Files created or modified as root may become inaccessible to the container's comfy user.
This can cause issues because ComfyUI runs as the comfy user (UID 1000) for security reasons. If you create or edit files as root, they will be owned by root (UID 0) and the comfy user may not be able to read or write them.
Best Practices When Using Root Access
-
Check file ownership after making changes:
ls -la /path/to/file -
Change ownership to comfy user if needed:
chown comfy:comfy /path/to/file -
For directories, use recursive ownership change:
chown -R comfy:comfy /path/to/directory -
Alternatively, switch to the comfy user after entering:
su comfy -
If you encounter permission issues later, use the fix-permissions tool:
fix-permissions
Alternative Methods for Editing Files
Editing Files Inside the Container with VSCode
How to Do This Using VSCode:
-
Install the “Dev Containers” Extension:
In VSCode, open the Extensions panel and search for “Dev Containers”. Install it.
-
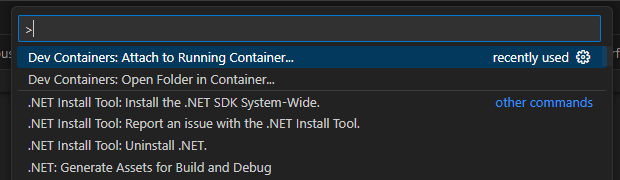
Attach to the Running Container:
Make sure your environment’s container is running. In VSCode, press F1 (or open the Command Palette) and type “Dev Containers: Attach to Running Container” and select it from menu:
Select the container you want to work with: (DON’T choose /comfy-env-frontend)

-
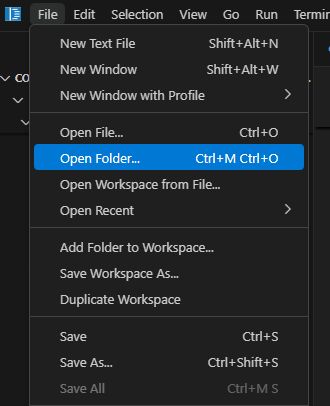
Open & Edit Files:
Once connected, VSCode will show the container’s file system. Open the “File” menu from the topbar and click “Open Folder”:
Now you can navigate to the location of ComfyUI saved in the container by typing “/app/ComfyUI/ in the provided field:

Click “OK”. Now in the left sidebar you should see the contents of your ComfyUI environment, and can browse folders, open files, and edit them just like you would locally. You can also drag and drop files from your machine directly into folders in the sidebar, which will upload them to the container. Any changes you make here will apply and be saved directly inside the container.
-
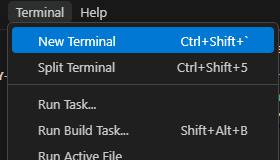
Open a Terminal to access the running python environment:
You can perform actions such as “git clone” and “uv pip install” inside of the container environment by opening a new terminal window after connecting:
You should see this terminal open at the bottom of the VSCode window:
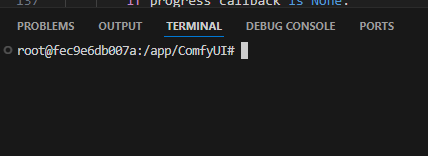
Now you can perform all your required installation actions just like you would on a local environment.
Why Do This?
- Perfect for tweaking custom nodes, environment configs, or any code that isn’t easily accessible from your host machine.
- Great for development and troubleshooting without having to rebuild or re-mount anything.